Posts Tagged ‘miniatures

23
Mar
11

Dwarven Forge Saves the Gary Con Terrain Challenge

When I go to conventions, I love to DM; it’s a great way to meet new people.  At Gary Con III, I’ll be spending just about all my time running an event called the Gary Con Terrain Challenge #1: Treasure Beneath the Brown Hills, about which the program book says:

Who will retrieve the most gold from the Temple of the Elder Elemental God and make it out alive? Terrain Challenge #1 is the first annual D&D competition using the fantastic miniatures terrain contributed to GaryCon by Pana. This year’s adventure imagines a roleplaying spin-off of Gary Gygax’s classic 1971 Chainmail scenario, Battle for the Brown Hills. Third level characters will be provided; all ages welcome.

Unfortunately, as the event drew near, the happy expansion of Pana’s family interfered with the creation of the terrain around which this event was supposed to be based. As a parent I fully understand & support spending more time with a newborn than with dollhouses for boys,  but this did leave me wondering how I was going to make the show go on.

Enter Dwarven Forge to the rescue! Founder and chief sculptor Stefan Pokorny graciously had me over to his new studio in Brooklyn, where we used his personal collection to put together a layout to suit my needs. As I’d described it at the Gary Con forums, the idea for the scenario is as follows:

I started by thinking about the great Gygax modules and what elements of them we could pay tribute to. The idea of which monsters would make cool miniatures was in the back of my mind, as was choosing a module that wasn’t totally over-familiar. What this made me think of was Battle for the Brown Hills, a Chainmail scenario that Gary wrote in the pre-D&D days & Paul Stormberg ran at the last Gary Con. Although it’s a large-scale wargame battle, it has some very evocative elements that feel like a roleplaying game waiting to happen. The thing that caught my imagination is that the side that stomped my orcs spent a lot of time moving a wagon train behind those hills, which I believe held the army’s payroll. My idea is that this heavy wagon breaks through the ceiling of a dungeon in the hills. The human mercenaries are all topside, looking through this sudden sinkhole at a fortune in spilled gold…

Here’s a tableside perspective on the terrain Stefan helped me assemble:

And here’s the top-down view that I took to be sure I could re-assemble this in Lake Geneva, using the two Room and Passage sets and two Cavern Sets that Dwarven Forge president Jeff Martin arranged to have shipped to me at the convention (plus a couple of special pieces on loan from Stefan that I’ll be bringing in my luggage):

Because the event is short – two hours, including character generation – I think we’re going to start with the PCs having rappelled down to that central elevated structure, where the fallen treasure wagon has landed. The action of the game will involve them loading themselves up with as much gold as they want to risk carrying, searching for an exit from the dungeon, and trying to make it out alive!

Thanks to the generous support of Dwarven Forge, I will be running this event not only at Gary Con but also at this year’s Arneson Memorial Gameday in NYC (about which more soon) and probably at an upcoming Recess as well. I’m really looking forward to having the chance to play with so much awesome dungeon goodness!

10
Sep
10

anybody can paint minis, part four

Brushwork

Logically, after covering the basics of getting paint onto your miniature, we can go on to topics and techniques such as washes, dry-brushing, and black-lining for improving the look of our miniatures. However I just wanted to take the time to talk about the really basic idea of using your brush right. On all these we will be of course discussing the typical 0 size synthetic brush that I recommended last week.

I teach art & design to kids in programs and to adults at a universities and the first common mistake that I see new painters do is that they just don’t know how to apply the paint to whatever surface they are working with. People have a built up experience of brushing their teeth, mopping floors, and painting their houses, so it is only natural for most of these new artists to shove their paint around and brush it about as if it was spackle that needed herding. They think of the paint as a substance that needs shoving around and wiping off, and this is true for new painters of canvases and for new painters of miniatures.

Painting for control and precision is a different experience. The goal is not to shove the paint where you want it to go, but to touch your brush to the surface and have your paint flow off the tip exactly where you want it. All the contact between the miniature and the brush should happen at the very tip of the pointed brush, so you can control where you put the pigment. If the bristles of the brush splay out , the paint mark becomes much more random and it’s almost impossible to retain control.

So what is required to keep your paint flowing off of the tip of your finely pointed brush?

  • You need to make sure that the paint is the right consistency. When you put your drops of paint color on your palette you have to mix in water to make the paint able to flow from the bristles of the brush. Mini-paint that comes in droppers is thin enough to only need a bit of water to thin it down. The paint that comes in pots usually needs a little more thinning down. On average, you want to have the paint be the consistency of heavy milk. Paint that is too thick will form a blob on your brush and conceal your tip, it will be hard to control. Paint that is too thin will take many layers to eventually cover the miniature and the coat of paint is easy to rub off because the acrylic binder is too weak to keep the paint film. Some pigments are just more transparent than others. Resist the urge to slop a heavy coat of paint on when you are trying to get a red, orange, or yellow part of your mini opaque. Several thin layers are much easier to control and cover the miniature much more evenly. You can even put additives in the water to have the paint dry slower on your palette or flow more easily in the recesses. I have several different droppers of water with different drying times and surface tensions that I add to the paint, advanced fiddling but very useful.
  • You need the proper light to see by and a comfortable position for your hands. Miniatures are small things you know and it’s hard to paint them, as it is, in broad daylight, so do yourself a favor and use a lamp. Painting under indirect daylight is the best, but any normal incandescent lamp can help you see better, especially in the evenings. Also find a comfortable position for your hands. For dine details like eyes, I find myself resting my wrists on the table edge to keep them steady but sitting up in a good work-chair should be enough for most of your process.
  • Your brush needs to come to a point as you paint. Once you see the tip of your brush running out of paint, dip onto the palette again and make sure it comes to a point by either rolling the brush over on a palette by twisting your fingers or wiping that little bit of excess paint off with a paper towel. I always have a paper towel underneath my tub of rinsing water and every time I dip my brush on the palette for more paint, I gently wipe the excess off with a streak across the towel. You can tell by looking at the tip and seeing if too much paint is held by the bristles. This will keep a consistent paint load on your brush that you can get used to.
  • Your brush needs to come to a point as it dries. You should rinse your brush out every once in a while to make sure none of the paint dries in the deeper bristles. You should never rest the brush in the water with pressure on the bristles because they will bend. And you should soap and rinse your brush before you put them away. Brushes become ruined (pointless) when paint dries in the bristles and splays them apart, so you have to use some hand-soap to rinse them clean at the end of the session. Warm water, and lather them up against your palm until no more color comes out. After they are clean, take a little bit of hand-soap and form a point on the brush with your fingers. This will help the brush to dry pointed when you lay it flat.

So that is how you keep a point going on your brush. And, in case you want to know, everyone has jittery hands to some degree. A little bit of practice just compensates for our own jitteriness when we are painting. So just ignore that excuse.

Next post we will get into some basic technique to make our lives easier.

03
Sep
10

anybody can paint minis, part three

Paint Your Miniature Now

Bare Essential Supply List

  • dish soap
  • sponge
  • 2 tubs for water
  • paper towels
  • Exacto or craft-knife
  • super-glue
  • palette paper or white plate
  • 2 synthetic hair short handle watercolor brush (nylon, taklon, sablette), one 0 size and one 000 size.
  • miniature paint (any brand, if needed you can go without the two browns, two silvers etc.)
  • white
  • black
  • bright silver metallic
  • dull silver metallic (gunmetal)
  • light brown
  • dark brown
  • light skin color
  • dark skin color
  • middle blue
  • middle red
  • middle yellow
  • middle green
  • black ink
  • brown ink

Bare Essential Instructions:

  • Soak your new miniatures in a tub of soapy water and sponge them off after a while. This will remove the mold release grease that all new miniatures have.
  • Dry your miniatures on a paper towel.
  • Cut all the excess casting metal (flash) from the miniature with your knife and carefully bend it into the proper shape.
  • Assemble and glue you miniature if necessary. Check the base for a proper fit before the glue goes on.
  • Plan out which colors will go where on the mini. Use a scrap paper to check for color combinations if needed.
  • Set the two tubs of water down on the table and put a folded paper towel under one of them. One of the tubs is to rinse your brush in, the other is to get fresh water from.
  • Paint a base-coat or priming layer on the mini to get it ready to accept the later coats of paint. Use black paint if your mini will be mostly dark colors or white if your mini will be mostly light colors. Red, orange, and yellow parts need to go over a white layer of paint.
  • Put a drop of paint on your palette. Put a drop or two of water on your palette next to your paint drop. Mix the paint and water so the combination has the consistency of heavy milk or light cream.
  • Get comfortable, pick the miniature up and hold it in your hands. If you need to, brace your wrists against each other or the table edge so they don’t move too much. Try and get used to painting sitting up straight.
  • Using just the tip of your brush, apply your chosen colors to the miniature like you were painting a coloring book. Just try to keep it in the lines.
  • The paint colors go on in layers. You usually have to make two or three coats of a color to get it opaque on the miniature. Do not glob the paint on to make it opaque. Work thin and in layers. Control is key, opacity builds up over time. Drying time is only a couple minutes.
  • Wipe excess paint or water off your brush with the paper towel, you should always have a point on your brush. Rinse the brush in water before starting a new color and don’t rest your brush in the water tub with the tip down.
  • Once you have covered the miniature with paint, you are done. Congratulations. You may alternatively keep correcting your paint edges but it’s not necessary.
  • Clean up. Rinse your brushes with hand or dish soap in the palm of your hand until no more color comes out. Use soap to make a point on your brushes and have them dry out laying flat. This will keep them pointed as they dry.

More arcane knowledge to follow. Post any question you have in the comments section.

28
Aug
10

anybody can paint minis: part two

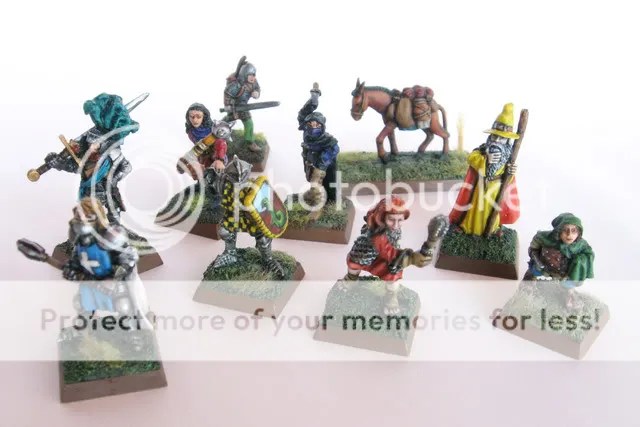
To be a good mini-painter, all you have to do is paint ten miniatures.

That is my bold blogging statement for the week. Usually they encourage you to say dramatic and impassioned things in your blog posts so that people keep returning to the blog to either feel passionate agreement or to progressively get more pissed off in their disagreement with the the bold statement. The problem with the above statement is that it isn’t really all that bold, it is more just a matter of truth behind what happens when you gain skill. And I don’t mean this for those who are mildly “creative” or “artistic”. Even the most graphically tone-deaf person who has never lifted a pencil or brush before in their life can do this.

Photobucket

Painting ten miniatures, start to finish, on separate occasions, is all you need to do to call yourself a “good” miniature painter. Those ten attempts at painting a little pewter figure will guarantee the development of at least a little bit of ongoing skill at the task. Even if you are dunking them into a pot of paint and letting them dry without any brushwork, you are bound to start dunking them in different pots of colors and start making a layer-cake arrangement of stratified colors on the mini. (That actually sound pretty cool, come to think of it.) Somehow those successive minis will get better and better until number ten. And then BAM, you are a good miniature painter.

In the process of painting your ten, maybe on miniature number four or five, dabbing at your chartreuse owl-bear, you may say to me: “This isn’t good miniature painting, this is just painting them slightly less crappy than before.” And I will reply: Yes, that is exactly so. By the time you finish number ten, it will be so “less-crappy” that it will qualify as “good”. It will all be downhill from there, nothing but learning a few slight tips and tricks after that, the hard part will be over.

Now, I need to be very specific about what qualifies as the “ten”. Remember that I said they had to be start to finish, on separate occasions. You can not do all ten minis at once, in one sitting. You need to begin, work on, and complete each miniature so you can learn from your mistakes and victories at each of the steps, in ten sessions. You can paint more than one miniature at each of the sessions, but you need the passage of time between sittings for the skills to sink in. Sat & Sun would work for two sessions. I recommend working on two to three minis at a session so you can switch between the choices while they dry out, but you can go with more. Ten at a sitting can be tiresome if you are doing something other than the discussed dunking method.

Once you are done with one of your ten minis, you absolutely must plop it on the table at the next game, if only to show it off. You need to take pride in your work and use your toy for playing with. Showing off and playing with friends is what it is all about.

So steel yourself for the grand creative adventure, or just get ready for your 3D coloring book. Next post I will give you the bare minimum list of materials and steps to get that mini on the table. More arcane advice to follow after that.

19
Aug
10

anybody can paint minis, part one

Photobucket
You too can paint little greedy people.

While playing in the ongoing Red Box campaigns I found that many of our tactical situations utilized miniatures and dice as markers to clarify spatial positioning and marching order and things like that. It was the natural extension of figuring things out for fights and “picturing the scene” while playing at the table. Considering D&D’s storied history, using miniatures seems to have been a staple of the hobby back in the old-school days as much as it is in the current toy-heavy iteration of fourth edition.  We all remember the prophetic cover of the Red Box D&D basic set:

This game requires no gameboard because the action takes place in the player’s imagination…”

But damn it, back in the day, those painted minis in the glass case at the game store looked so cool.

So fast-forward past my subsequent years earning a BFA and an MFA in painting and I am looking around the game table at our regular sessions. With up to ten people playing at a session, I was surprised to find that while many players had either a pre-painted D&D mini or a bare-metal representation of their character, practically no one was exhibiting the secret and profane art of miniature painting.

After bringing in my box of minis I found that there were a number of other players at the table who still thought painted minis where awesome but never had the chance to take a leap into the actual brushwork. I decided to plan for a group painting day where I could share all my hard-won information about painting little tiny people for those without the benefit of the supplies or instruction.

As a result I will be posting some outlines and advice over the coming weeks about how absolutely anybody can get started with painting their classic or new miniatures that they have collected. Hopefully this will allow even the most abominably unskilled artist to slap some colors on their nekkid mini, plop them on the table and be proud. Stay tuned.


Past Adventures of the Mule

May 2024
M T W T F S S
 12345
6789101112
13141516171819
20212223242526
2728293031  

RPG Bloggers Network

RPG Bloggers Network

Enter your email address to subscribe to this blog & get email notification of updates.

Join 1,056 other subscribers